")
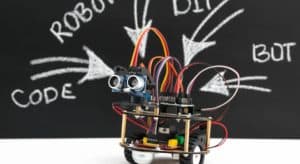
If you’re interested in getting started with robotics and Arduino but are feeling overwhelmed by what is required to do so, you’ve come to the right place.
Before you actually start programming, you will need to install software on your computer that will allow you to write code and create programs. Our guide will teach you how to install and set up the official free and open-source Arduino IDE as well as several great alternative Arduino IDEs. We will also go over how to install Arduino libraries. Libraries allow users to use simple pre-written functions to control common robotics elements like sensors and motors.
Libraries make coding more efficient and allow you to quickly develop code for your tech projects.
For example, the Arduino timer libraries give us an easy way to get the time and date without the need to write complicated code from scratch. Additionally, the Arduino stepper library is used in many projects to help your robotics projects run exactly like you want them to quickly and efficiently.
What is the IDE Software?
An Integrated Development Environment (IDE) is software programmers use to write code and build applications. This usually includes a code editor, builder, and debugger. A code editor is where the programmer writes the code.
The builder (also called a compiler) takes the code and turns it into 1s and 0s so that the computer or microcontroller can understand it.
A debugger is a tool that displays information about the program so that errors can be spotted easily. In short, an IDE provides everything you need to create your own programs for Arduino microcontrollers.
Arduino Terminology
You may have heard the term “Arduino” many times before while working with tech or learning about electronics and robotics. Some of the terms associated with Arduino are often used interchangeably, so it may be confusing to those starting out in electronics to understand what is going on.
In this section, we outline the key terminology that you should know.
Arduino
Arduino is the name of the electronics company that makes the development boards such as the Arduino UNO. The Arduino company also makes the Arduino IDE software and provides lots of various electronics resources.
Sometimes the term “Arduino” is used interchangeably with “microcontroller”, but Arduino is only one of the companies that makes microcontroller products. That is to say that other microcontroller companies exist as well.
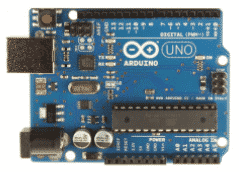
Arduino UNO
The Arduino UNO is a popular model of development board made by Arduino. While the UNO is one of the most basic development boards available on the market, it has been a “tried and true” device and is great for beginners. An image of an Arduino UNO is shown below:
Arduino IDE
The Arduino IDE is the software on your computer used to write code and program it to the Arduino microcontroller. The language used in the IDE is Arduino C which is based on C and C++ syntax.
To learn more about coding in the Arduino language, check out our article on it.
Development board
Many people often interchange “development board” with “microcontroller”. However, a development board includes the assembled circuit board, pins, and microcontroller chip. Development boards are mainly used to prototype electronics and microcontrollers. The Arduino UNO is an example of a development board.
Microcontroller
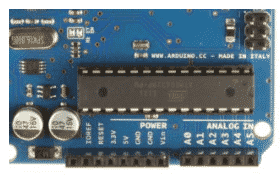
The microcontroller is the chip used to control and interact with sensors and actuators. The microcontroller runs the code and turns it into electrical signals. The microcontroller used on the Arduino UNO is called the ATMEGA328P and is made by Microchip (which recently acquired Atmel, the original producer). In the image below, the large rectangular chip is the microcontroller of the Arduino UNO.
If you are new to how Arduino works you can learn about it from our Arduino Beginner’s Guide.
Sketch
A program or code you write in the Arduino language is called a sketch. You can create a sketch in the Arduino IDE.
.INO (file format)
The .INO file type is what the Arduino IDE uses to save a sketch. After writing your sketch, you can save it and open it again at a later time to edit it or to upload it to your board. One way to remember this file format is that the three letters in its name are the same as the last three letters of “Arduino”.

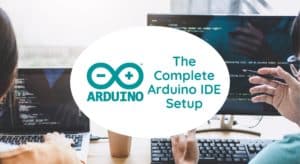
How to Install the Arduino IDE
The Arduino IDE is a free-to-use, open-source program and is the most commonly used IDE by hobbyists to interact with their Arduino devices. This IDE provides a simple way to write Arduino code and upload it to a microcontroller.
Not only does the Arduino IDE support the native Arduino boards, but it also provides support for other boards and microcontrollers such as the ATtiny85 and the ESP8266.
The Arduino IDE can also download Arduino libraries straight from the menu options, which we will discuss later.
The Arduino IDE can be downloaded directly from the Arduino website and works with Windows, Linux, and macOS.
To download the Arduino IDE, go to the official website here and select the download option for your operating system from the list on the right. For Windows, we recommend the first option listed.
The Arduino IDE is updated fairly frequently so your version number may not match the one in the image. We recommend you use the latest stable build (located on the right pane) instead of the hourly builds, which are more unstable.
If you are prompted for a donation, you can click “Contribute and download” to provide a donation or click “Just download” to continue. The Arduino IDE is free to download and use but you can choose to donate to support the developers.
After the download is completed, find the file and open it to start the installation process. Follow the instructions you see on the screen using the default options. The installation should only take a few minutes. After installation, you can open the Arduino IDE from your system menu or desktop.
How to Setup a Board
Once you have installed the Arduino IDE successfully, there are two other settings you may need to change. You will need to have the Arduino connected to your computer via USB cable to change these settings.
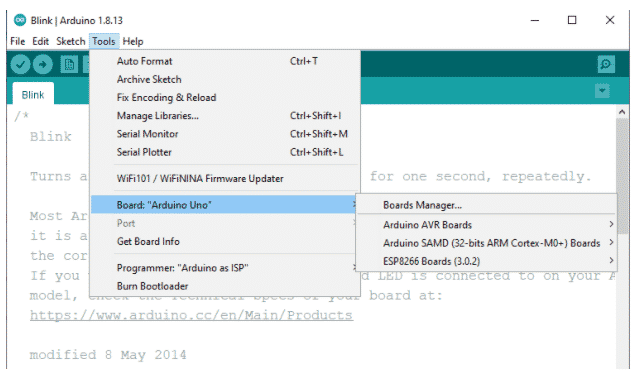
First, make sure you have the correct development board selected. If you are using the Arduino UNO, click Tools > Board > Arduino AVR boards then select Arduino UNO. The Arduino AVR boards include all the traditional Arduino boards. Arduino SAMD includes the newer boards that use the ARM Cortex chips.
If you are not using an Arduino product board, select “Boards Manager” to download additional boards. You can also add board manager URLs in the Preferences menu.
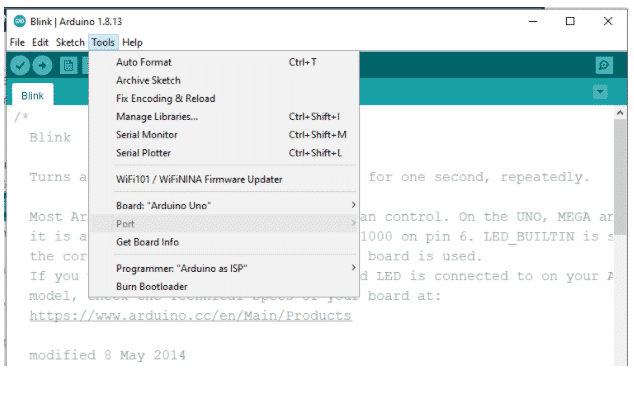
The next thing to do is to select the correct COM port. The communication (COM) port specifies which port the Arduino is connected to in the computer. To select the COM port, click Tools > Port then select the correct COM port you are using. For advanced Windows users, you can view your COM ports in your computer’s Device Manager tools.
If you plug in your Arduino to a different USB port or if you plug in multiple devices, your COM port number may change, so always make sure it is correct before starting.
If you require any additional troubleshooting, see this article from Sparkfun.
How to Install Arduino Libraries
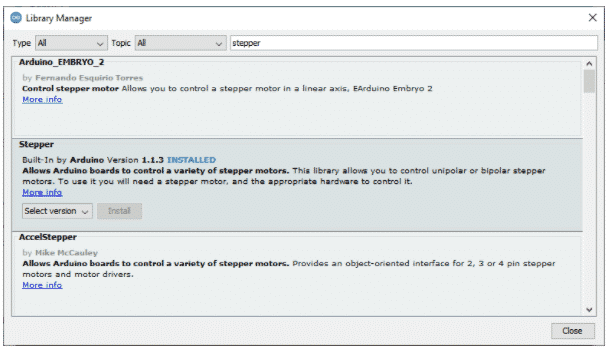
Installing libraries with the Arduino IDE is a very simple task that comprises of only a few steps. For this example, we will install one of the Arduino stepper libraries. This library can be used to control a stepper motor, as the name implies.
From the Arduino IDE menu, go to Sketch > Include Library > Manage Libraries…
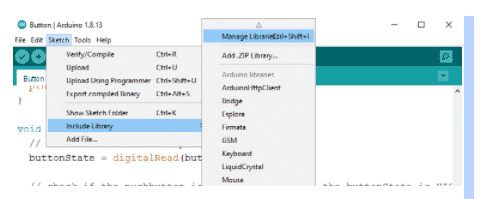
A pop-up menu should have opened. In the search bar, type “Stepper”. A listing for Arduino stepper libraries should appear. If you can see it, select the Stepper library and click Install. If you are prompted to install additional libraries, choose yes to all.
How to Use Libraries
After you’ve installed the Stepper library, you must specify in your code that the library is used in your program. Typically, this is done at the start of the program and looks like this:
#include <Stepper.h>
After you’ve written the above line, you will be able to use all the functions of the Stepper library in your program. Note that you must include this line in each program that you want to use the library in.
If you are using a different library, the format of the line remains the same. For example, say that you wanted to use a library called MyLibrary. You should type the following line at the beginning of your program:
#include <MyLibrary.h>
You can always read the documentation of a library if you need a reminder on how to use the commands provided by it. The official documentation for the Stepper library can be found on the Arduino website here.
If you aren’t familiar with the Arduino Language, or you just want to refresh your memory, you can get started with our Arduino Beginner’s Guide.
How to Install Other Libraries
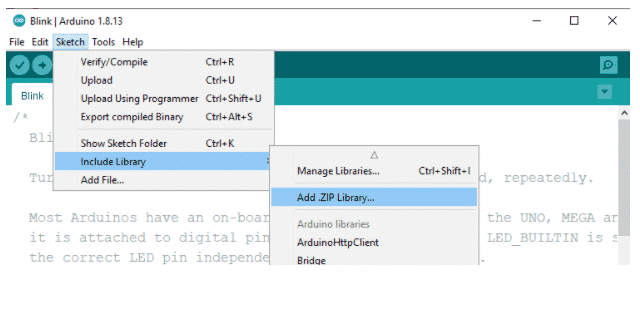
If a library is not in the library manager, you can also install a library manually. Many Arduino libraries that other users have created can be found on GitHub, a code-sharing platform.
First, download the source code of the library. Typically, the Arduino library will be in a ZIP file as it may contain multiple files. These may include the headers file, source file, and example sketches. Next, click Sketch > Include Library > Add .ZIP Library…, then select the downloaded file.
Alternatives to Arduino IDE
The original Arduino IDE is a reliable one and used by many electronics enthusiasts. While it is simple and beginner-friendly, the Arduino IDE is missing many of the features that modern IDEs have, which make coding an easier and more enjoyable experience.
Most notably, the Arduino IDE lacks a code autocompletion feature, which suggests commands for you as you type your code. Features like this can help remind you of the correct syntax of specified commands in a library. Other features include refactoring, which helps with code organization and debugging and allows you to run code line by line.
The following sections detail some of the more popular alternatives to the Arduino IDE.
Arduino IDE 2.0 (Beta)
Arduino has launched its second major update to bring modern programming features to a first-party, easy-to-use IDE. The Arduino IDE 2.0 keeps the same look and feel of the original but is updated to a modern style with some menu placement changes. The Arduino IDE 2.0 should not be confused with the Arduino Windows app or the Arduino web app.
It should be noted that this IDE is still in early development and many bugs are still being patched. The Arduino developers are working hard and releasing frequent updates to Arduino IDE 2.0, so keep checking to see if the Arduino IDE 2.0 is right for you.
You can download Arduino IDE 2.0 from the official website.


Atom
Atom is a free and open-source code editor developed by GitHub. Atom has many features of modern programming IDEs, such as autocompletion. You will need to download the Platformio add-on after installing Atom.
For more information, visit the official Atom website and see the Platformio package.

Visual Studio Code
Visual Studio Code, also commonly referred to as VS Code (and not to be confused with Microsoft Visual Studio), is another free modern code editor that is popular among many programmers.
VS Code supports many different programming languages in addition to Arduino, including: Java, Javascript, Python, C, C++, and more. It is a great choice for users of the Windows operating system because of its versatility, modern features, and options for customization.
To program Arduino with VS Code, you will need to download the Arduino package by Microsoft and also install the C/C++ package from within the software. For more information and assistance with installing VS Code, please see the official VS Code site.

Conclusion
You should now have the IDE of your choice up and running, as well as the knowledge of how to use libraries to more quickly write code with the Arduino IDE for your robotics projects.
To get started with the ins-and-outs of actually writing an Arduino project, please see our guide that covers all of the basics of Arduino programming below.

Join our Tech Tribe Community and be the first to learn important global tech news and improve your skills in engineering/robotics/3D printing, and more. Continue to quickly learn all the knowledge you need for DIY electronics or your college program with our Learning Hub.