")
If you’re wondering about Arduino language programming you’ve come to the right place. In this article, we’ll talk about key concepts like Arduino variable types, C++ coding as well as Arduino global variable usage.
We will also explain Arduino if-then conditions and how to use loops. After reading the article you’ll be on your way to developing your Arduino C++ skills!
In this guide we will cover:
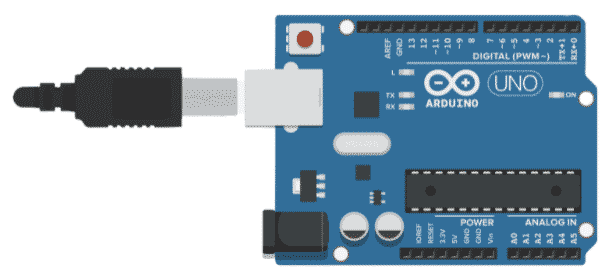
If you are new to Arduino, take a look at our Arduino Beginners Guide.
What is the Arduino Language, C and C++?
Is the code used in Arduino C or C++? Actually, the Arduino language is a combination of both C and C++ syntax. Even if you don’t know C or C++, continue reading as we’ll be going over the basics of the Arduino language so that you’ll understand even if you’re completely new. If you want more information on the background and basics of the Arduino language and example of Arduino code, please watch the following video from Sparkfun Electronics.
You can also look up the syntax of functions, commands, and conditions on the official Arduino website.
Below is an example of Arduino code. In this example it is showing you how to blink an LED light.
					/*
  This example code is in the public domain.

  https://www.arduino.cc/en/Tutorial/BuiltInExamples/Blink
*/

// the setup function runs once when you press reset or power the board
void setup() {
  // initialize digital pin LED_BUILTIN as an output.
  pinMode(LED_BUILTIN, OUTPUT);
}

// the loop function runs over and over again forever
void loop() {
  digitalWrite(LED_BUILTIN, HIGH);   // turn the LED on (HIGH is the voltage level)
  delay(1000);                       // wait for a second
  digitalWrite(LED_BUILTIN, LOW);    // turn the LED off by making the voltage LOW
  delay(1000);                       // wait for a second
}

Arduino Variables and Types
A variable is something we use in programming to store and retrieve information. To create a variable we need to name the variable and define the type of data stored in that variable before assigning it a value. You can think of a variable as labelled container for your data. We can use variables to store data such as sensor readings, text inputs, and calculations. There are also different types of variables that store different types of information.
Detailed below are three key data types you will need to know before you start programming.
Integer
An Integer (int) can store zeros, as well as positive and negative numbers but not decimal values. Integers are the most common type of variable used to store data.

As an example, let’s declare an int named myInt and set its stored value to 78:
int myInt = 78;
Floating Point Number
A floating point number (float) stores real numbers. Unlike most other data types, floats can store decimal values.

In the following example, a float named myFloat is declared and its value is set to 78.89:
float myFloat = 78.89;
Boolean
A Boolean variable (bool) can store only two values: true or false. Boolean values are useful for conditional statements. These statements allow certain sections of code to be either executed or ignored, depending on whether the statement is true or false. For Boolean values, true can also be represented by “1” and false can also be represented by “0”.

As an example, let’s declare a Boolean named myBool and set its stored value to true:
bool myBool = true;
Local and Global Variables
When you create a variable somewhere in your code, you can’t use it outside that section of code. Variables can only be used within the “scope” that they are declared in. For example, a variable defined inside of one function cannot be used in another function. We call these variables in a function a local variable because they can only be used locally, inside of the function, which is its “scope”.
Conversely, we can also declare a variable outside every function, so that the scope will be the entire program. When a variable is declared outside of any function, it is called a global variable as it can be used anywhere in the program.
The following code snippet demonstrates the implementation of a global and local variable:
					// This is a global variable and can be accessed anywhere in the program
int myGlobalVariable = 7;

void loop() {
    //This is a local variable and can only be accessed within this loop() function
    int myLocalVariable = 6;
}
While global variables are very powerful, experienced programmers will avoid them for complicated projects as global variables are harder to keep organized.
Conditionals
When we want a block of code to run only some of the time, we can create a conditional, which specifies that the block of code should be executed only if certain conditions are met. There are three types of conditionals for Arduino: “if”, “else” and “else if”. If the specified conditions in your program are true, then the code inside the conditional will be executed. If the specified conditions are false, then the code will be skipped.
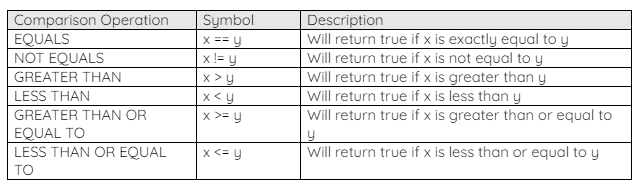
Boolean and comparison operators are used to create more complex conditions for a conditional statement. Like in math, logical operations follow an order of operations. Parentheses can be used to specify which logical operation should be performed first. Boolean operators use Boolean operands (i.e. true or false) and they are listed in the following table:

Comparison operators use numerical operands and are listed in the following table:

if Statements
The if statement checks if a certain Boolean condition is true or false. If the statement is true, then the block of code in the if statement will be executed. If it is false instead, the code will not be executed and skipped over. The condition is contained by parentheses and the code to be executed is contained by curly braces. An example if statement is shown below:
					int x = 100;
if (x > 72) {
    x = 7;
    y = 3;
}
After executing, the code above will assign x the value of 7 and y the value of 3 as x was set to 100, which is greater than 72.
else Statements
The else statement can only be used after an if statement and cannot be used alone. The code inside the else statement will execute if the code inside the if statement did not run. Therefore, else doesn’t need a condition as it relies on the condition of the previous if statement being false. For an example, see the following code segment:
					int x = 3;
if (x >= 72) {
    x = 7;
}
else {
    x = 42;
}
After executing, the code above will assign x the value of 42. Since x is initialized to 3, and 3 is not greater than or equal to 72, The code with the if statement will not be executed. Instead, the code within the else statement will be executed.
else if Statements
The else if statement is used after an if statement or another else if statement. The else if statements will execute their code block only if the previous if statement was false and the current else if condition is true. It will then skip over any remaining else or else if statements that follow. For example, see the following code segment. The following snippet demonstrates a simple else if program:
					int x = 20;
if (x >= 72) {
    x = 7;
}
else if (x == 20) {
    x = 24;
}
else if (x >= 20) {
    x = 0;
}
After executing, the code above will assign x the value of 24. Since the initial value of x is 20, it is less than 72, and the code in the if statement will not execute. The next else if condition will then be checked. Since x is equal to 20, the code in the first else if block will be executed and x will take the value of 24. The last else if statement is skipped since one of the previous conditions was true.
Functions
Often times a portion of the code is used several times in different places. Instead of writing the same code multiple times, we can create a function to perform a specific task. Similar to functions in mathematics, a function in programming takes one or more inputs and returns one or more outputs. Functions are used to make your code more modular. Once you create a function, you can call that function anywhere you need in order to use it.
A function call is only a single line of code.
This is great as it can shorten the length of the program and makes it easier and quicker to read by eliminating redundant code.
To create a function we need a function name, input parameters, and the expected output data type. A block of executable code, found inside the function, is responsible for calculating the outputs. The output value is sent back to where the function was called by using the return statement.
Certain functions do not produce an output. For example, if a function is used to print a string of text to the screen, there is no output value. We can use the void data type to indicate the function will not return anything. Additionally, a return statement is not required for void functions.
As an example, let’s create a function that takes two integers as parameters and returns their sum.
					int addTwoNumbers(int x, int y) {
    int sum = 0;
    sum = x + y;
    return sum;
}
In the first line, we create the function and specify all the characteristics of the function. We specify the output type with int (written before the function name), so we know that the output will be an integer. Next, we name the function addTwoNumbers. In the parentheses, we note the function will accept two integers as its input. The first input will be x and the second will be y.
The lines in curly braces contain the code that will be executed when the function is called. Typically, this is the portion of code used to take the inputs, process them, and return the result. The last line of the function is used to return the answer back to the main program.
Here’s an example to show how we can call the function we just created.
					void setup() {
    int mySum = 0;
    mySum = addTwoNumbers(7, 8);
}
In the code above, we initialize the integer mySum. Then, we can assign it a value using a function that has the same data type. We call the addTwoNumbers function and provide the arguments 7 and 8. Within the addTwoNumbers function, the local variable x will take the value 7 and the local variable y will take the value 8. Those two values are added together and then the return command sends back that value. This value is then assigned to mySum in the setup function. Therefore, the value in mySum is 15 at the end of execution..
For more information on functions in Arduino, please refer to the following video from Core Electronics:

Loops
When we want to execute a block of code multiple times we can use a loop. A loop is very useful if we want to execute a code multiple times, in a sequence, or if we want to repeatedly perform the same task. The number of times a loop is executed is specified in the condition. The one exception is the default loop function in Arduino because it loops indefinitely.
Besides the default loop function, there are two other types of loops that you will need to know when working with Arduino. These are the while loop and the for loop.
while Loops
A while loop will continuously loop until its condition turns false. If the condition is never false, the program will be “stuck” in the loop and will not be able to leave without the use of a break statement. If the condition is false to begin with, then no code within the loop will be executed and the section of code will be skipped over.
The following is an example of a while loop:
					int x = 0;
int y = 50;
while (x < y) {
    x = x + 2;
    y = y + 1;
}
This program initializes two integers x and y with the values 0 and 50 respectively. Next, the program checks the condition for the while loop, and since it is true (0 being less than 50), the code within the while loop will be executed next. First, the value of x will be increased by 2. Then, the value of y is incremented by 1. This code will be repeated as long as x is less than y. The code will finish execution once x is no longer less than y, and this will specifically occur after the loop has executed 50 times. After 50 executions of the loop, x will have been incremented to 100 and y will also have been incremented to 100. Since the numbers are equal, the condition for the while loop is no longer true and the program will exit the loop.
for Loops
A for loop is used to repeatedly execute a block of code a specific number of times. Typically, you will know how many loops are expected beforehand and you can use a simple counter to count the number of loops before stopping. There are three elements of a for loop statement: the initialization (the starting value), the condition (often the maximum value), and the increment (often +1). It is tradition to use an integer variable called i as the index of the counter.
A typical for loop will look like the following:
					int x = 0;
for (int i = 0; i < 100; i++) {
    x = x + 2;
}
The initialization is where i is declared and initialized to 0. This is executed only once at the beginning. The condition is i < 100. This means that the for loop will continue looping its code block until i is no longer less than 100. The i++ is the increment. Once the code block is executed, and the iteration of the loop is over, i will increment by 1.
The for loop above will execute from i=0 to i=99 for a total of 100 repeated. After 100 executions, the value of i will be exactly 100, and the condition will no longer be true. The final value of x will be 200.
To find out more on for loops in Arduino, please see the official Arduino documentation.
Conclusion
With the knowledge in this article, you should be able to understand and write basic Arduino, C and C++ code. All of the fundamentals have been covered, including:
- Variables and the different common types that available to use
- How to use conditional statements to add decision-making logic to your programs
- How to create functions to increase the modularity of your code
- How to use loops to repeat certain sections of code.
There is a lot of information covered here and you are encouraged to refer back to this document as you continue to learn coding for Arduino. Taking advantage of your resources is one of the key strategies to improving your overall programming skills.

Join our Tech Tribe Community and be the first to learn important global tech news and improve your skills in engineering/robotics/3D printing, and more. Continue to quickly learn all the knowledge you need for DIY electronics or your college program with our Learning Hub.