")
Geared stepper motors are one of the most versatile and useful motors in robotics. Their ability to move in small steps allows for precise position control. So if you want to learn to create inspiring Arduino or Raspberry Pi stepper motor projects, learning the principles of how to make your electronics projects move is crucial.
If you don’t know all the fundamentals of Arduino learn here before reading.
In this Beginner’s Guide you will learn:
Stepper motors are vital to the performance of robotic systems and applications.
From 3D-printers and robotic arms to slot machines and camera components, stepper motors are everywhere in our lives.
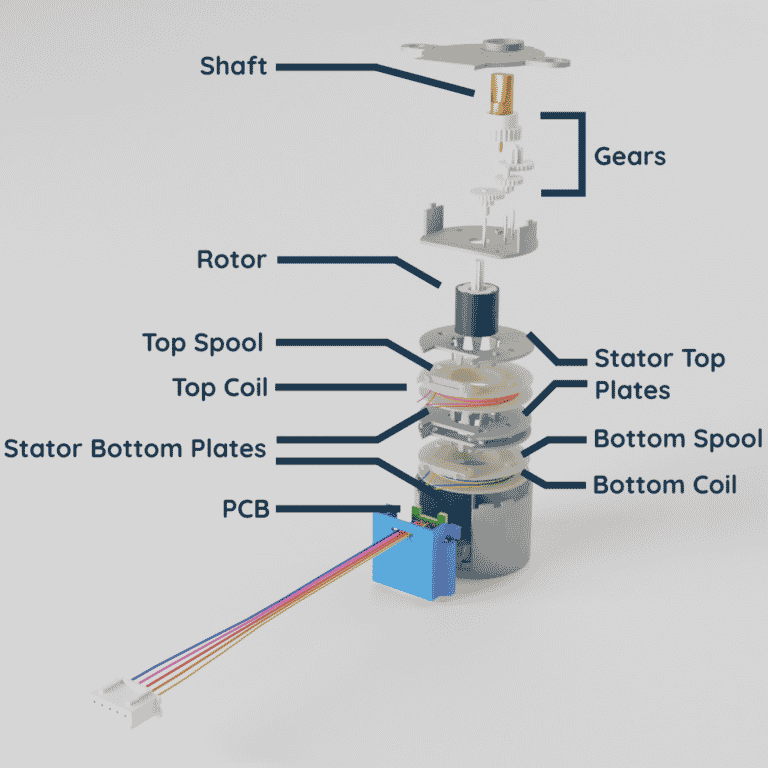
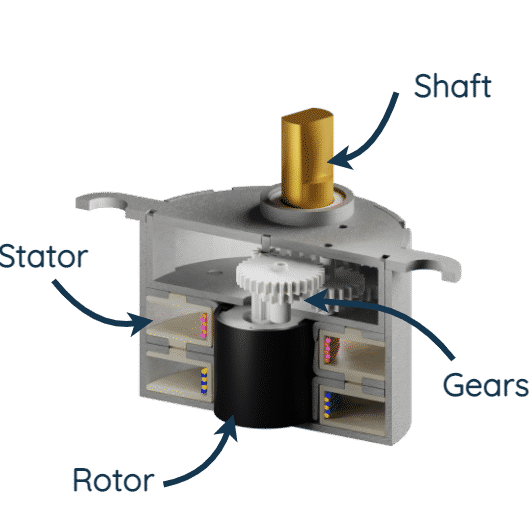
While they may seem difficult to understand at first, once you see its inner workings, you will see that it is quite a straightforward and elegant design. In this guide, you will learn the ins and outs of stepper motors, from their construction to the underlying electromagnetic forces that drive them. You can see an exploded view of a specific stepper motor in the image below.
The Key Terms You Need to Know
Before we get into the specifics of stepper motors, we’d first like to cover some basic terms relevant to all motors for the complete beginners out there.
In this section we will cover the terms:
- Stator
- Rotor
- Shaft
- Rotational speed
- Torque
If you’re already familiar with the above terms, you can skip on ahead to the next section which gets into stepper motors.
Parts of a Geared Stepper Motor
All motors, including stepper motors, consist of a stator (the part that stays still) and rotor (the part that rotates or spins). Energy flows through the stator to the rotor, using electricity for electromagnets to drive the stepper motor, producing rotational motion on the shaft. Motors can also be geared, the gears connect the rotor to the shaft and modify the output of the motor using a gear ratio.
The image below points out these parts on a very common small stepper motor known as the 28BYJ-48. The datasheet for this motor can be found here.

Stepper Motor Torque vs Rotational Speed
A motor’s has two key outputs, rotational speed and torque.
Let’s first discuss rotational speed since it’s very similar to any other speed. You would usually measure a car’s speed in a straight line in miles/hr or km/hr (m/s is also sometimes used). For rotational speed, instead of measuring it in, say, m/s in a straight line, you’re measuring the speed in revolutions per minute, or RPM, which is essentially the rate something can complete a full revolution. An animation illustrating rotational speed vs (linear) speed is shown below.

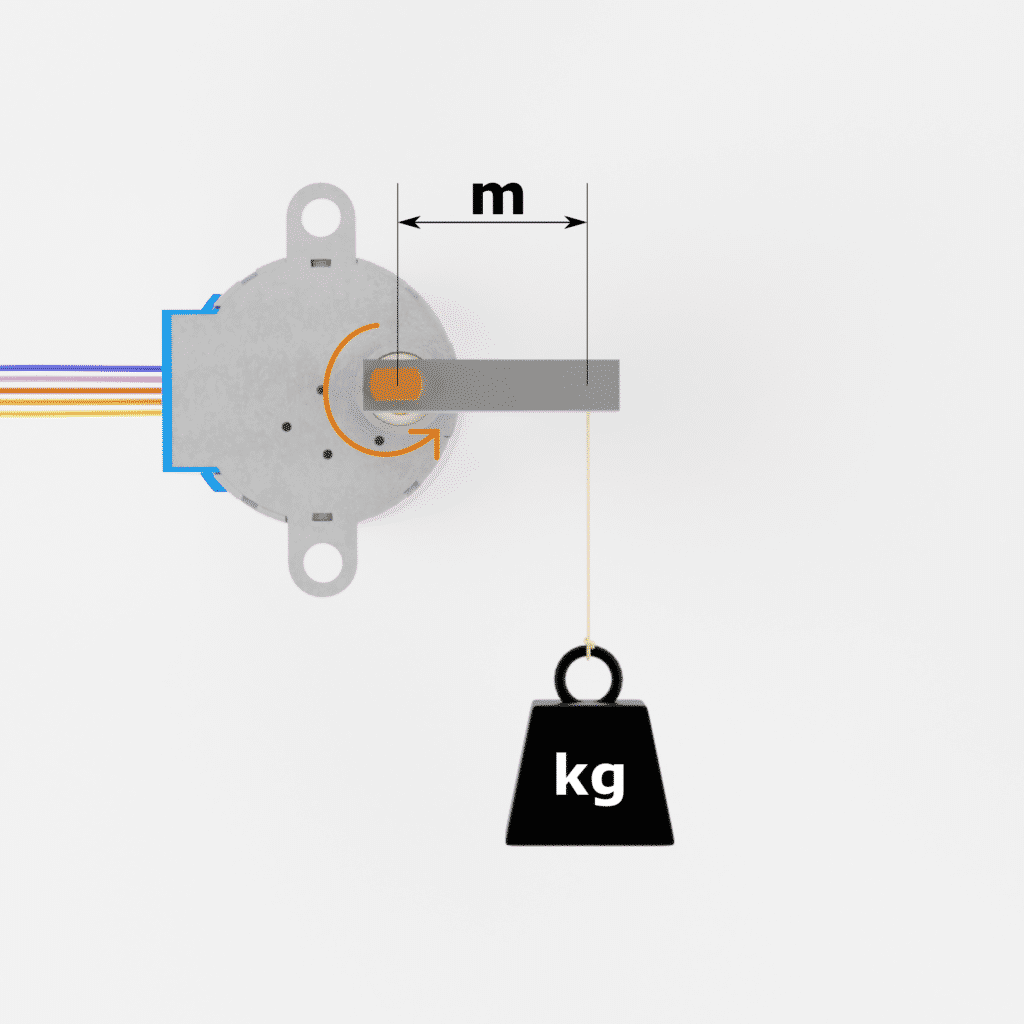
Torque, on the other hand, can be considered analogous to a rotational force.
Here are 3 tips to increase the torque.
All the physics and math related to torque is out of scope for this post, but the torque of a motor is essentially proportional to how much force is required at a given distance to stop the rotor from spinning. To illustrate this idea let’s look at the image below, if the weight hanging off the bar was really heavy, and the motor is still spinning, then we have a high torque for that motor. Conversely, if the weight was very light and the motor can’t move, then that motor has a really low torque.
What is a Stepper Motor?
As we mentioned at the beginning of this post, stepper motors are commonly used in applications from 3D-printers to robotic arms. You might be reading this right now because you want to create your own project in one of these applications. That’s great!
However, one question that you might be asking yourself is “What makes stepper motors best suited for these applications?” Let’s answer this question by listing a stepper motor’s strengths and limitations.
The strengths of the stepper motor lie in its low cost, precise position control and speed control, high low-torque speed and high holding torque. It is somewhat limited by its low efficiency and limited high speed torque. In general, a stepper motor’s strengths align very well with low speed and high precision applications. So for any project which values precision over speed, and may require a lot of low-speed torque, a stepper motor would be a good choice to use.
How Does a Stepper Motor Work?
One of the key attributes of the stepper motor is its unique ability to move in small increments and have precise control of this movement and position. To illustrate this point we can create a simple stepper motor using four electromagnets and a permanent magnet as shown in the image below.
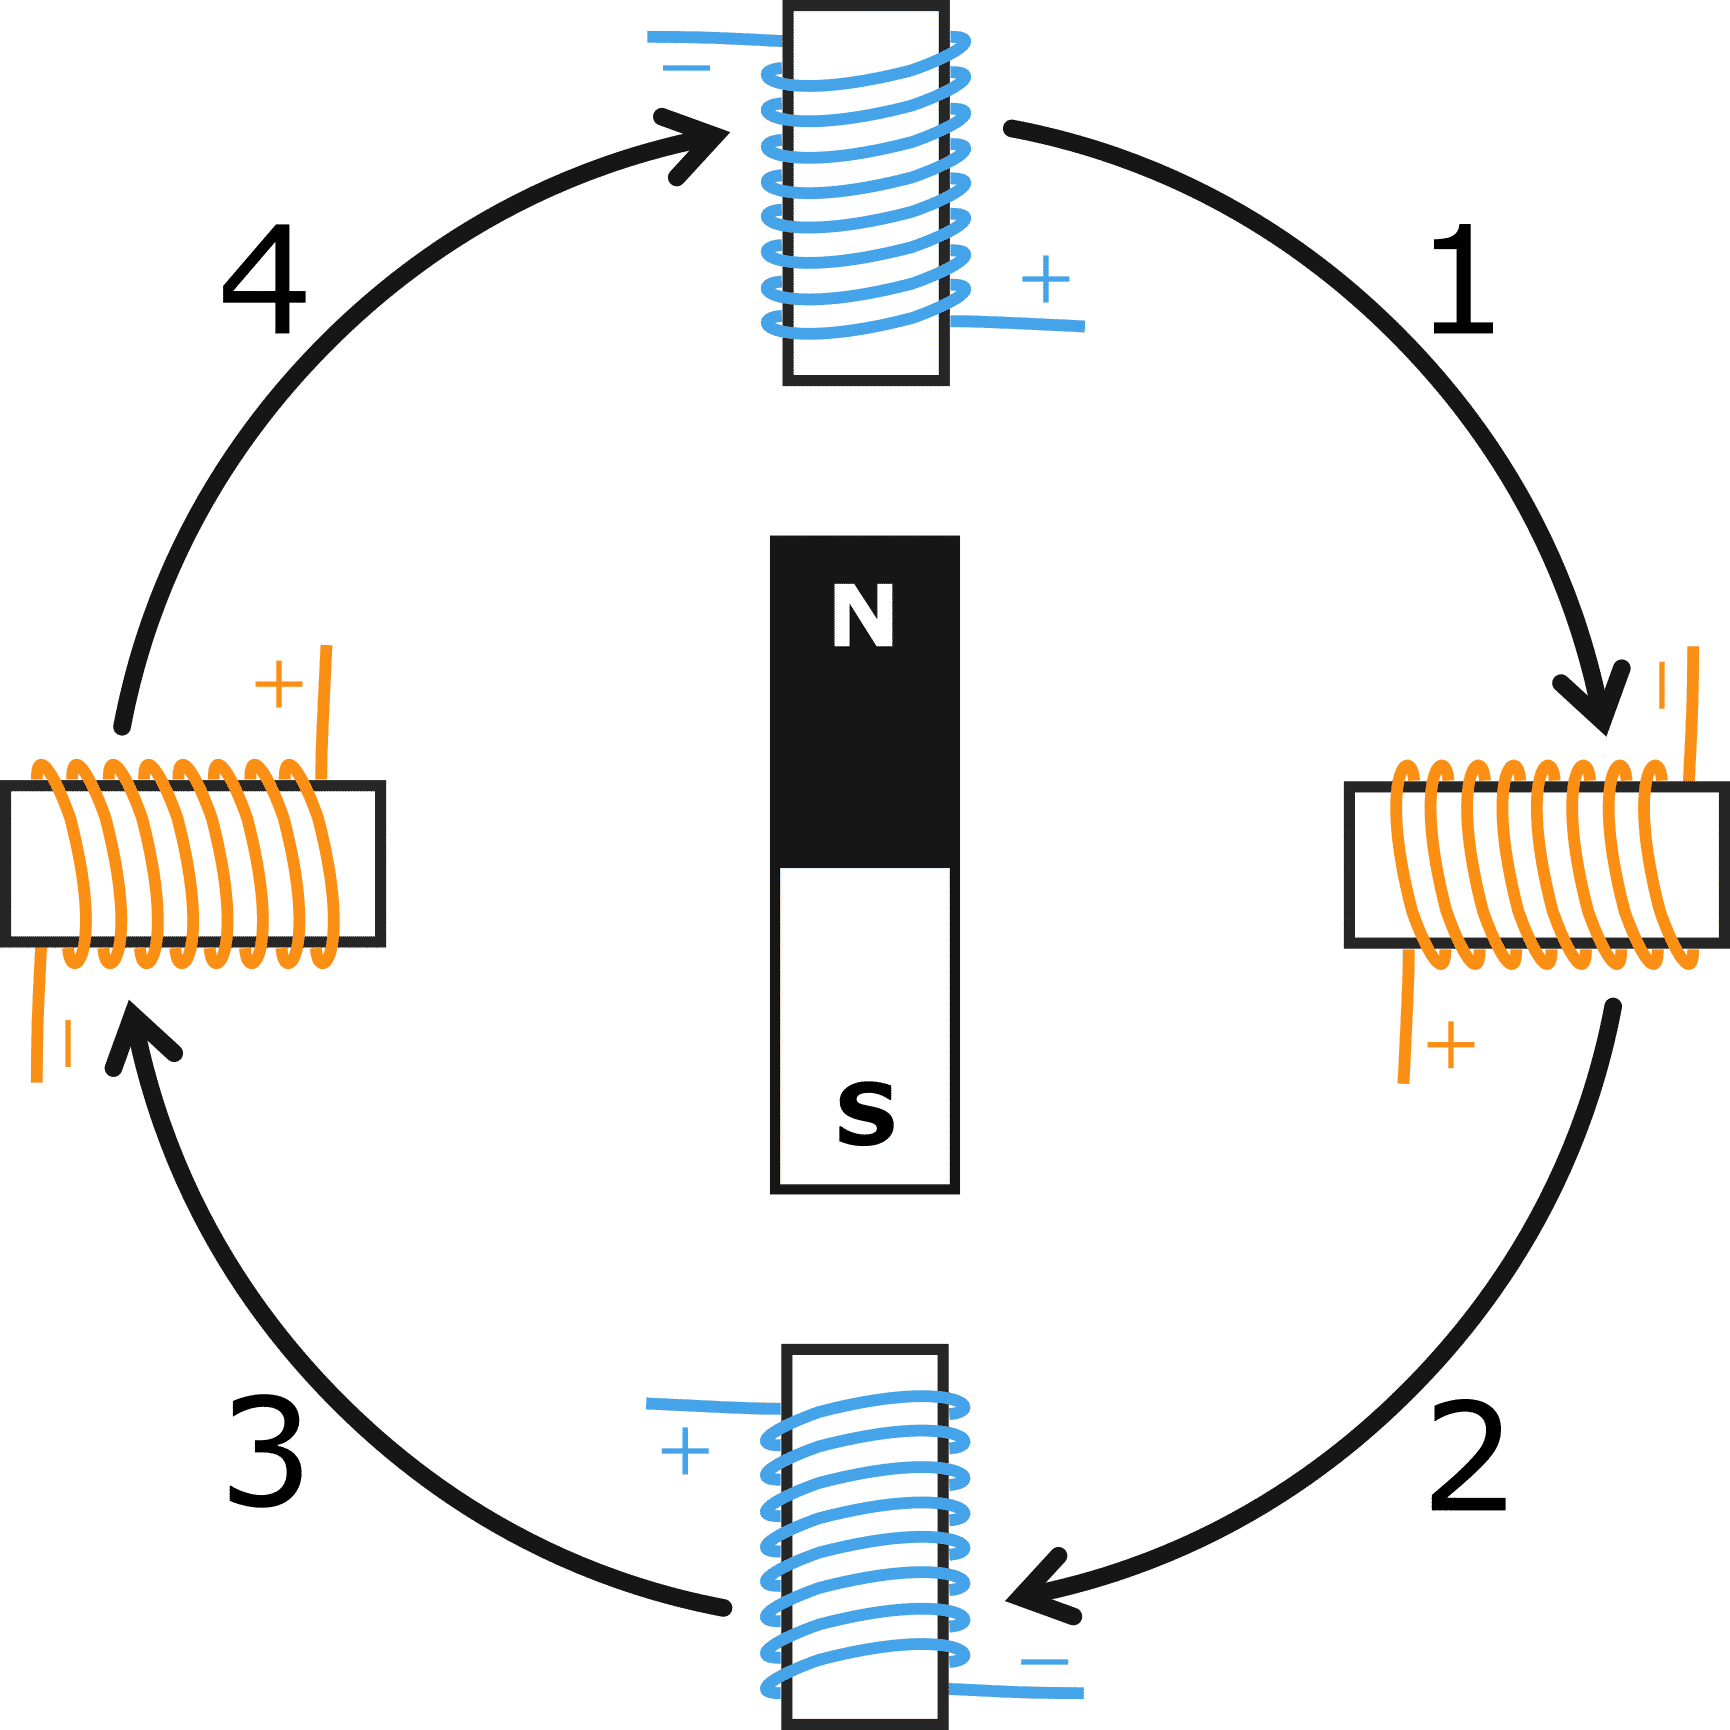
The permanent magnet in the center represents the rotor, which is only able to spin in place. The 4 bars stationed around the rotor represent the stator, which consists of coils of wire wound around small bars called teeth, protruding parts of metal from the stator.
Each tooth is very similar to a home-made electromagnet, like wire wrapped around a nail.
When a given wire coil is turned on, the magnetic effect will be activated and the North pole of the rotor will point to the South pole created by it, resulting in a rotational force and rotating the shaft (by 90 degrees in this case). The coil can then be turned off at the same time that the next coil is turned on, at which point the rotor “jumps” or “steps” to the next position. Since the rotor rotates in discrete directions (as opposed to continuous rotation like in other motors), it looks like the shaft of the stepper motor is suddenly stepping to the next position. This is where the stepper motor gets its name.

How Does a Stepper Motor Work?
So now that we’ve covered the basic ideas describing how to get these motors moving, let’s dive into more details on how we go about doing that.
In this example we go through the simplest way to control your stepper motor, Full Stepping.
Let’s revisit our simple 4 tooth stepper motor example. We know that in order to point the permanent magnet in a certain direction (and consequently turn the motor shaft) we need to turn on the coil that corresponds to that direction. So, in order to make the motor spin, what coils would we have to turn on and off and in what pattern?
Well, since we have 4 coils (which can also be called the 4 phases in this example), this pattern can be broken down into 4 steps, as shown in the images below.
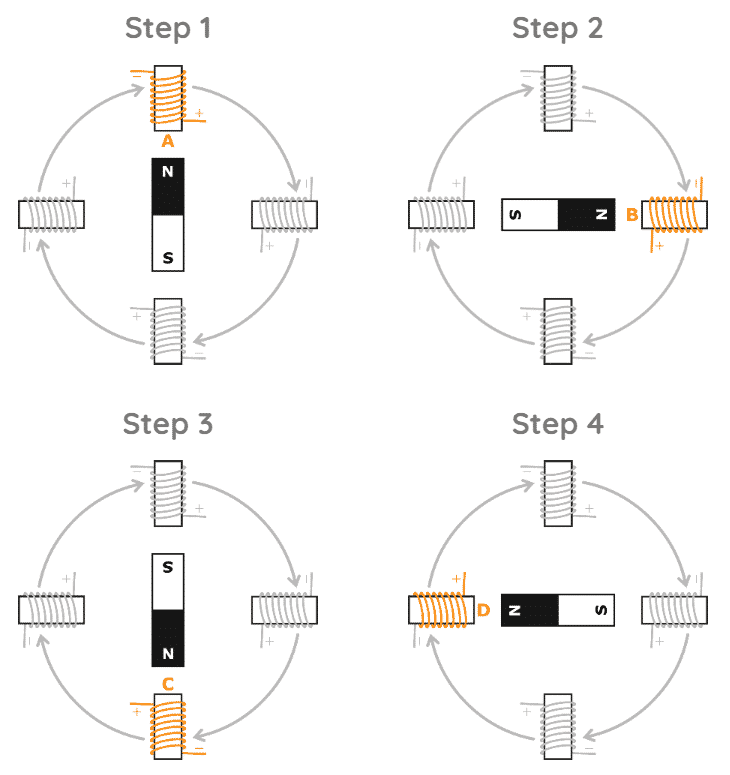
Let’s go through the process; the 4 phases are placed 90 degrees apart to rotate the magnet one step at a time. Each time we want to move to the next place, the current phase is turned off and the next phase is turned on, and the rotor moves 90 degrees clockwise. When we turn on each coil sequentially, we can complete a full rotation of the permanent magnet and bring it back to its original position.
In each step, only one electromagnet is turned on, the previous electromagnet is turned off and the permanent magnet rotates 90 degrees. Generally, these coils are turned on and off using a microcontroller paired with a motor driver.
To make your life easier look into getting an Arcimuse with your Arduino to dramatically save time creating.
Although we won’t go into the details of programming the control sequence in this post, but here is a helpful guide how to. The signals provided to the 4 phases would look something like the image below.
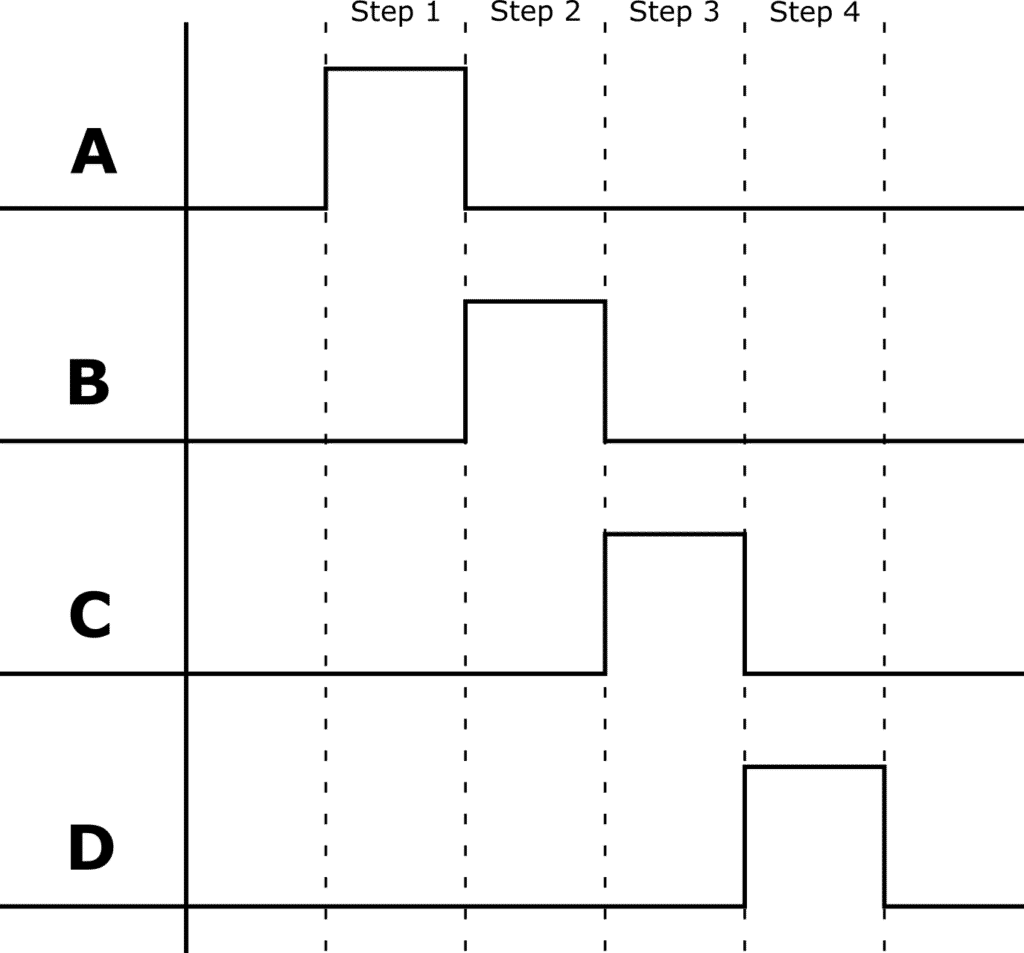
By programming the stepping sequence above into the microcontroller, we can command the microcontroller to go through the sequence very quickly, reaching higher rotational speeds, by speeding up the sequence.
Advanced Stepper Motor Wiring
We should point out that these 4 coils can be connected to each other in different ways and change the total number of phases. One way we can achieve a 2 phase wiring is to connect the coils directly across from each other in parallel and then alternate the on-off sequence between the two resulting phases.
Finally, we should also point out that instead of just turning the current phase off, we can set up the wiring to reverse the voltage to repel the North pole away for additional torque.
Conclusion
From this guide, you have learned the basics of what a geared stepper motor actually is and how it works from a technical and robotics point of view. The key concepts that you learned include:
- The internal structure and parts of a stepper motor
- The naming terminology that will allow you to talk about and describe a stepper motor
- The advantages and disadvantages of stepper motors and when to use them
- The process of properly wiring a stepper motor
Now that you know the basics of stepper motors, you are ready to start applying this information towards your own robotics projects. From custom robotic cars to more advanced DIY 3D printers and everything in between, you are ready to start leveraging the power of this critical robotics component.

Join our Tech Tribe Community and be the first to learn important global tech news and improve your skills in engineering/robotics/3D printing, and more. Continue to quickly learn all the knowledge you need for DIY electronics or your college program with our Learning Hub.