(14)")
Whether you’re learning how to make a simple robot or you are designing an advanced Arduino project that implements IoT and Raspberry Pi.
Learning the engineering design process steps is crucial for the proper development of your project.
Diving straight into a complex project without planning ahead will almost always result in issues that increase the cost and complexity of your project. It is therefore important to have a problem-solving mindset, utilizing tried and true best-practices and engineering design process steps when approaching complicated problems. In the long run, doing so will save you both time and money.
You may be curious as to what the engineering design process steps are. In this article, you’ll learn about the V-model, one of the most common and powerful engineering development processes that helps us approach problems in a systematic way. If you follow this process correctly, you will see an immediate improvement in your problem-solving capabilities and, in general, produce better designs.
By the end of this article, you will be able to answer:
What is the V-Model Development Process?
The V-model is one of the most commonly used and efficient development processes. It is a very powerful concept and the process is frequently used in the engineering and technology sectors of industry. The core idea of the V-model is a simple 3-stage process, set up using multiple nested layers of requirements, to create an overall product. We will discuss the concept of a requirement in more detail at the end of this article. The 3 stages include:
- Develop a design by establishing requirements for each layer
- Implement the design by realizing the requirements at each layer
- Validate/debug the implementation by testing the requirements at each layer
Although this idea sounds like common sense, there are a few more important aspects of the V-model that take this 3-stage process a bit further.
When creating a design, the V-model encourages you to first set out the high-level requirements of the design before working out the mid- and low-level requirements.
The high-level requirements you outline will lead you towards determining the mid- and low-level requirements (and their associated aspects) more easily. In order to understand what this all means, let’s first discuss the high-level requirements of a project. High-level requirements are broad in scope and are mainly about what the final completed project should be capable of doing. For example, let’s say we want to build a small stepper motor project that can be controlled by a given user input. One of the high-level design requirements could be “a small stepper motor that rotates when a user presses its sensor.”
The mid-level requirements are more specific in scope than the high-level requirements and are typically associated to systems, subsystems, and components. For example, for the same small stepper motor project, a mid- or component-level design requirement could be “the sensor component should output voltage from 0 to 5 V”.
Finally, the low-level requirements and implementation can be thought of as the “nitty-gritty” aspects of the design. An example low-level requirement/implementation could be a specific line in code or the need to connect a certain wire to a specific voltage node. These requirements are typically described in hardware design and/or software code files.
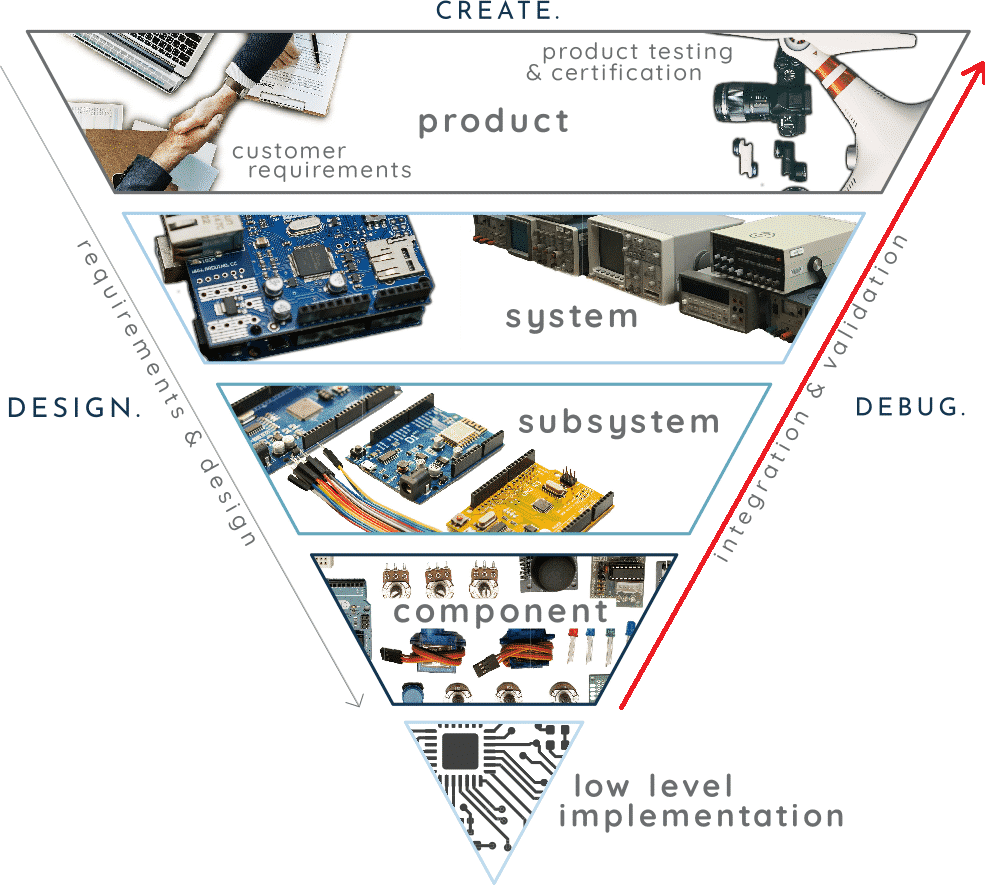
The below image shows what the V-model development cycle is all about. Notice the three core ideas: design, implement, and debug that collectively allow you to create products, as well as the high-level requirements at the top of the V and the low-level requirements at the bottom.
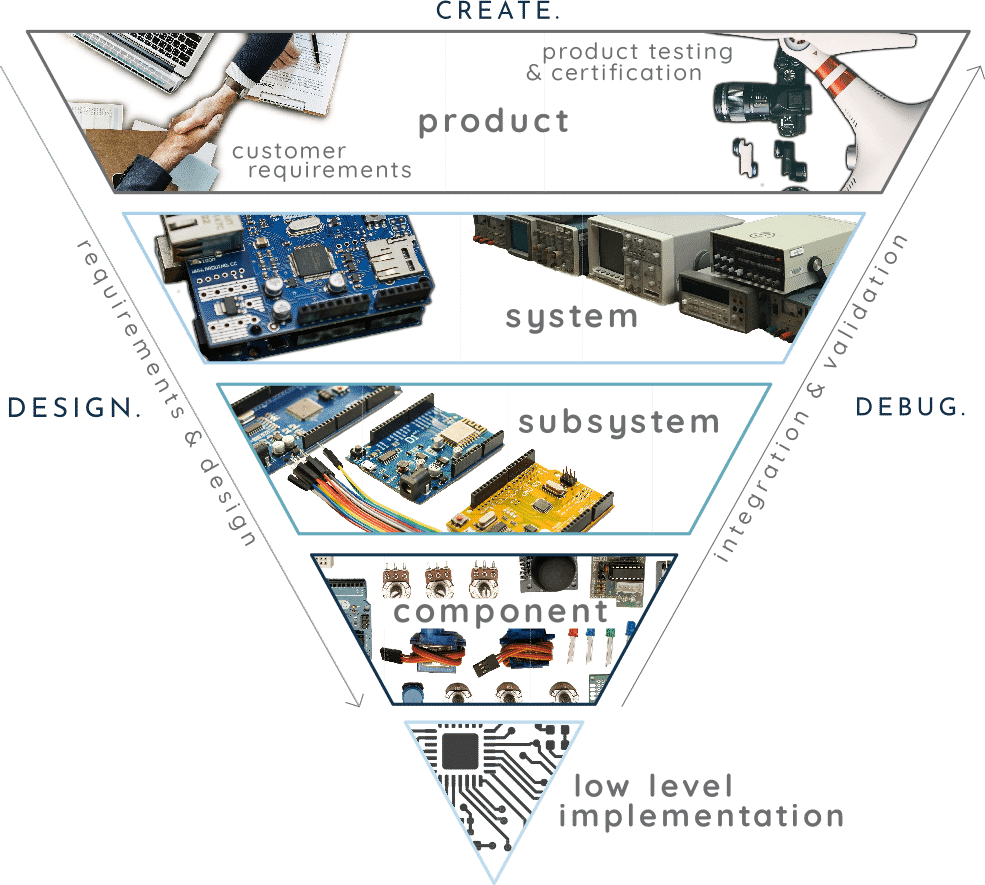

Stage 1 - Design
Let’s now look at the first stage of the development process: design. This stage is where we go down the left side of the V (in the direction of the red arrow in the image below). As we go down, we will get more and more specific about what our requirements, and therefore our design, should look like and determine what specific mid- and low-level design elements are required to implement our high-level ideas.

Using the same small stepper motor example from before, as we move down from the high-level idea, one of the first things we would need to add to the design is, what specific hardware will we use for that? Once we know what hardware we are using, we can define what our program should be responsible for. An example would be “writing Arduino code that will be responsible for reading data from the sensor and processing it.”
If we want to go even further, we can define and design the specific functions required to implement the functionality of that program. This can be something like “writing a function that sends a value to the stepper motor when the sensor is activated by the user.”
The beauty of the V-model development process is that the next design ideas come naturally from the design ideas that came before it. Each design element can be broken down further and further until implementation and creation becomes straightforward. The process or breaking things down naturally causes you to consider more options than just tackling the problem head-on. It also ensures that you don’t miss out on any critical elements for your design, including other ideas, issues, or general things you may have thought of in advance.

Stage 2 - Implementation
The second stage of the development process is implementation. This stage is where we implement the various requirements of our design, starting from low-level implementation, connecting those to create components by realizing component-level requirements, connecting those to create subsystems by realizing subsystem-level requirements, and so forth. We should point out that although the V-model images presented here show 5 layers, your project may only require 3 or 4 layers.
For many Arduino-only projects, the implementation stage will consist mainly of writing Arduino code. However, for other types of projects using additional boards and components, the implementation stage may consist of other tasks such as building the hardware components, interconnecting them to build subsystems, and so on.
Stage 3 - Validation
Now comes the final stage of the V-model process: validation. This stage is where you go up the right side of the V (in the direction of the red arrow in the image below), and check your implementation against the design and requirements you laid out in stage 1. Validation includes things like testing for errors and ensuring that the end project meets the design requirements as originally laid out at the product-level.
One of the biggest advantages of using the V-model is that all the implementations get tested at multiple layers and therefore in a variety of ways. If an aspect of your design is not working properly, it is pretty straightforward task to troubleshoot your problem using this method. You can then change that design and its requirements to solve your errors. From there, you can also determine if you might need to add more design elements and requirements, following which you can implement and validate the layers again.
How to Apply the V-Model in Your Projects
The V-model is inherently iterative and it allows you to improve and correct your design over time. After finding an issue with validation at a layer, you cross over to the left side of the V at the same layer, change the requirements and design, and repeat the process until the layer is validated. Once you have made it all the way up the right side of the V and have validated at the product-level, your project has achieved its key high-level purpose and you’re done!
In general, the V-model development process will help you approach a problem in a procedural way. It will also allow you to break a large problem down into smaller pieces, eventually allowing you to take on more ambitious projects than you ever considered and get them completed faster that you ever thought possible. The benefits of the V-model include:
- Leading to better designs by allowing you to consider more solutions than if you were to just dive right into the project and pick the first solution that came to mind.
- Allowing for a creative and diverse problem-solving mindset.
- Saving you time in the future by allowing for more thorough and thought-out designs.
- Making it easier to communicate your ideas in a precise way to reduce miscommunication.
- Saving you time debugging low-level implementations by testing each component individually and again over multiple layers.
How to Create Requirements for Your Projects
Now that we have gone over the V-model in detail, let’s discuss the idea of a requirement in more detail.
A requirement is a single functional need that a design must satisfy. Requirements are key to the engineering design process and directly relate to the V-model. The quality of requirements will directly reflect the quality of the end result, our project. There are several things that constitute a “good” requirement. A good requirement should have all the key components of “SMART” goals and should be:
- Specific and easily understood.
- Measurable/verifiable, and we should be able to confirm that a requirement is met or not through testing.
- Achievable, such that it can be broken down into smaller “sub-requirements” until a component- or low-level implementation is reached.
- Relevant to the project, such that it’s not only aligned with the other requirements being considered at its own layer, but to the requirements in the layers above and below it, and therefore the overall project. For example, setting a requirement to use gold as the conductor of choice in a given project may be relevant in some extreme cases, it would be quite irrelevant in other cases.
- Time-based, such that it can be designed and realized in a realistic timeframe.
We can use the V-model development process to create progressively more specific requirements as we work our way down the left side of the V from the high-level to the low-level requirements. As we work up the right side of the V, we can validate that each of these specific requirements until we are certain the the top product-level requirements have been met.
Conclusion
Now that you are familiar with the V Model and the steps involved in the engineering design process, you are much more equipped to tackle larger and more complex projects.
Following the three main steps of the engineering design process, as well as using your knowledge to set your key requirements will allow you to work more efficiently and systematically approach difficult problems and designs. Remember to work from high-level requirements down to low-level requirements to make the most out of the V Model design process.
Join our Tech Tribe Community and be the first to learn important global tech news and improve your skills in engineering/robotics/3D printing, and more. Continue to quickly learn all the knowledge you need for DIY electronics or your college program with our Learning Hub.